


There was a period of time when I was only sewing with knit fabric. Although some say that it is more challenging to sew with, I began to enjoy the ease of using my serger to sew and finish seams neatly in one step.
I still feel the same way, but I’ve lately become bolder to use some of my favourite woven fabrics. After all, I don’t want them to just gather dust or go to waste.
The Titchy Threads Rushbrook dress and top was a fantastic opportunity to take the bull by the horns. Laura Titchener’s tutorial is one of the most professional I have ever seen. It has all the necessary information laid out in an organised manner, with beautiful computer-drawn graphics. It even has a legend on each page to explain which fabric and side is being shown, and saves you the trouble of flipping back to look for it. It’s detailed without making me feel overwhelmed and lost in a sea of words.
Making this dress was honestly a huge challenge for me. It’s been some time since I’ve done bias binding, and it’s the first time I’ve made a a real button placket with real buttonholes, not to mention a half-button placket. I was perhaps too ambitious when I agreed to join the blog tour, but I’ve learnt many lessons from this project. My skills were stretched indeed, borrowing from the pattern description on the website (I’m still a “confident beginner” and not an “intermediate” sewist yet).
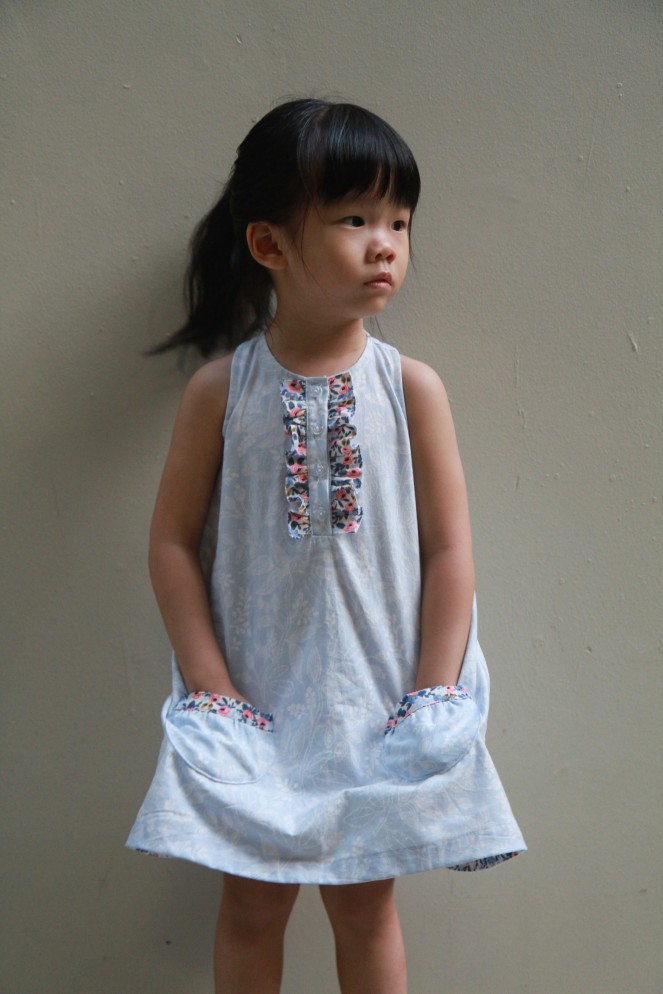
In order for the final product to be really well-made, Laura doesn’t skimp on the steps. Firstly, there are French seams. Then, with regard to bias binding for the neckline and armholes, there’s understitching to ensure that the binding is not visible from the outside. We’re instructed to stitch a triangle at each corner of the pocket to strengthen the stitches. Besides the pre-pressing steps, Laura also regularly instructs us to press the seams and such. These little steps make the jump from home-made to professional. (Even though my execution can be improved, it doesn’t detract from the quality of the pattern!)
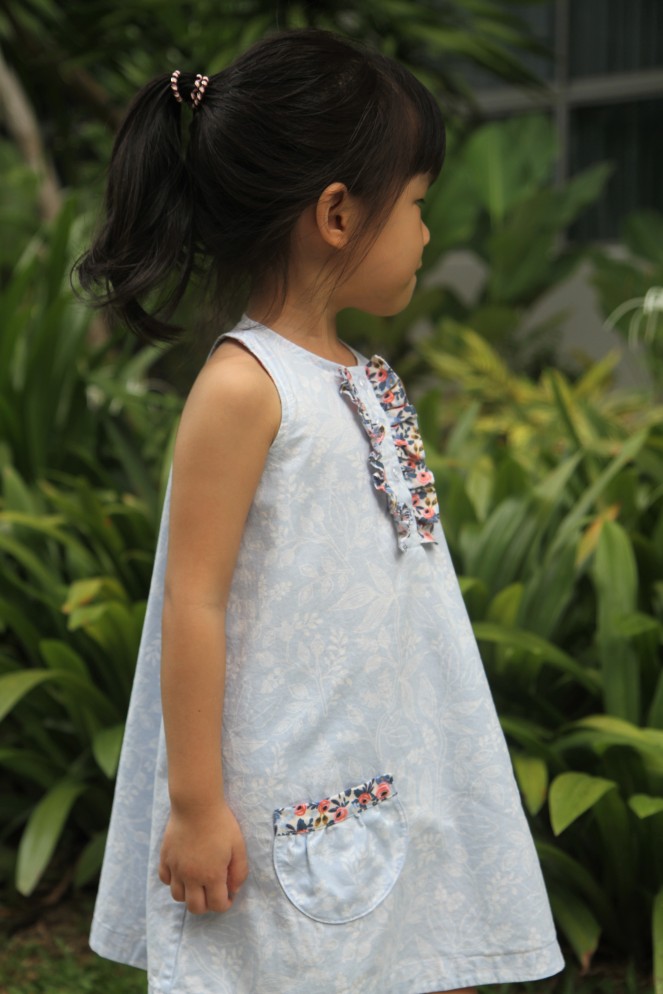
The dress or top can be hemmed with a facing, or finished with a ruffle hem. I chose the former as I don’t usually go for ruffles, though the placket ruffle was an exception. I thought the Rosa Periwinkle fabric needed to be showcased more (it’s what I used for the “hidden” bits too!) and it’s definitely a great sister fabric to the Queen Anne Pale Blue. On hindsight, it may have looked better with a ruffle hem. Perhaps you could cut out your hem pieces only after sewing the rest of the dress or top so that you can visualise better which option is more suitable.

There is a wide range of sizes, from 12M to 12 years. I made this in the 18-24M size with the size 3 length. If you’re going to use the hem facing, you could adjust its shape with the help of the adjusted front or back pattern piece before cutting it out. That would save you the trouble of having to paste another piece of paper behind it first.
If you thought the placket ruffle looked unbalanced, your eyes weren’t playing tricks on you! It must have shifted when my centre pin came out and I re-pinned it. I should have checked it before sewing down my placket pieces (insert “facepalm” emoji). It was too late to re-start then, and I was already in panic mode. I decided to soldier on and leave this as a lesson for next time.
I took a much longer time than expected to finish sewing this dress, flaws and all (I am probably the slowest sewist on earth!), and I must really thank Laura for being understanding. It’s the first time I’ve been invited to a blog tour, apart from a pattern I tested, and yet I couldn’t finish it on time. I’m really sorry about it. Anyway, as I struggled through all the various sewing techniques, it’s really given me a greater appreciation of those who sew for a living. I can totally understand the price tag on some store-bought garments now.

Thanks for swinging by my blog! Here’s a round-up of all the blogs on the tour, as it was originally scheduled (links below). I’m going to catch up on reading the ones I haven’t visited too!
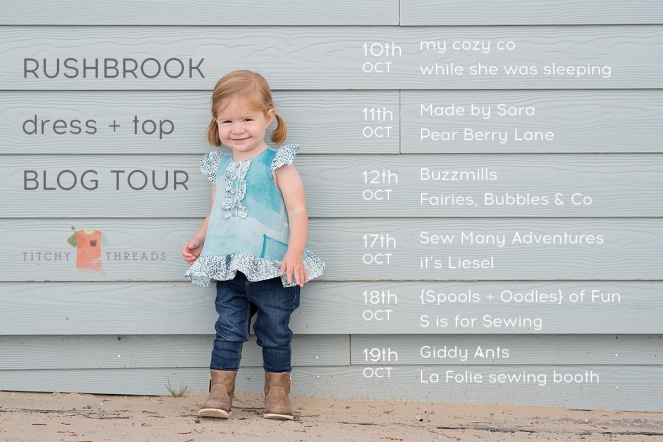
18th Oct – {Spools + Oodles} of Fun / S is for Sewing
19th Oct – Giddy Ants / La Folie sewing booth

This is such a gorgeous dress Angeline, I love your choice of fabrics and that photo of the hem facing looks absolutely perfect. I totally understand that things come up some time, and I’m really happy you were able to join the tour!
LikeLike
Hi Laura, thanks for the opportunity really! Your instructions are so detailed and they’re helpful for a beginnner. I’m really proud of this dress. ❤️ After seeing Ines Melo’s knit hack, I feel tempted to try it too! 🙂
LikeLike